

How to Complete an Air Brake Test
Jason Boudreau • March 13, 2025
Performing a proper air brake test is a crucial part of any pre-trip inspection and one of the most common reasons CDL applicants fail their final state exam. To help students succeed, CDL Powersuite has created a step-by-step guide designed to simplify this essential test. This one-page resource serves as a practical tool for CDL instructors, providing clear instructions that reinforce best practices and improve test readiness. By consistently using this guide, students can build confidence, refine their skills, and significantly increase their chances of passing their state test on the first attempt.
Training students to perform a proper air brake test is essential for ensuring vehicle safety and helping them pass their CDL pre-trip inspection. Each step containing quoted text should be emphasized and spoken aloud by students during practice to reinforce learning, build confidence, and ensure they follow the correct procedure on test day.
*Some states have different testing requirements, make sure to consult your state's CDL manual to confirm this material is accurate for your state.
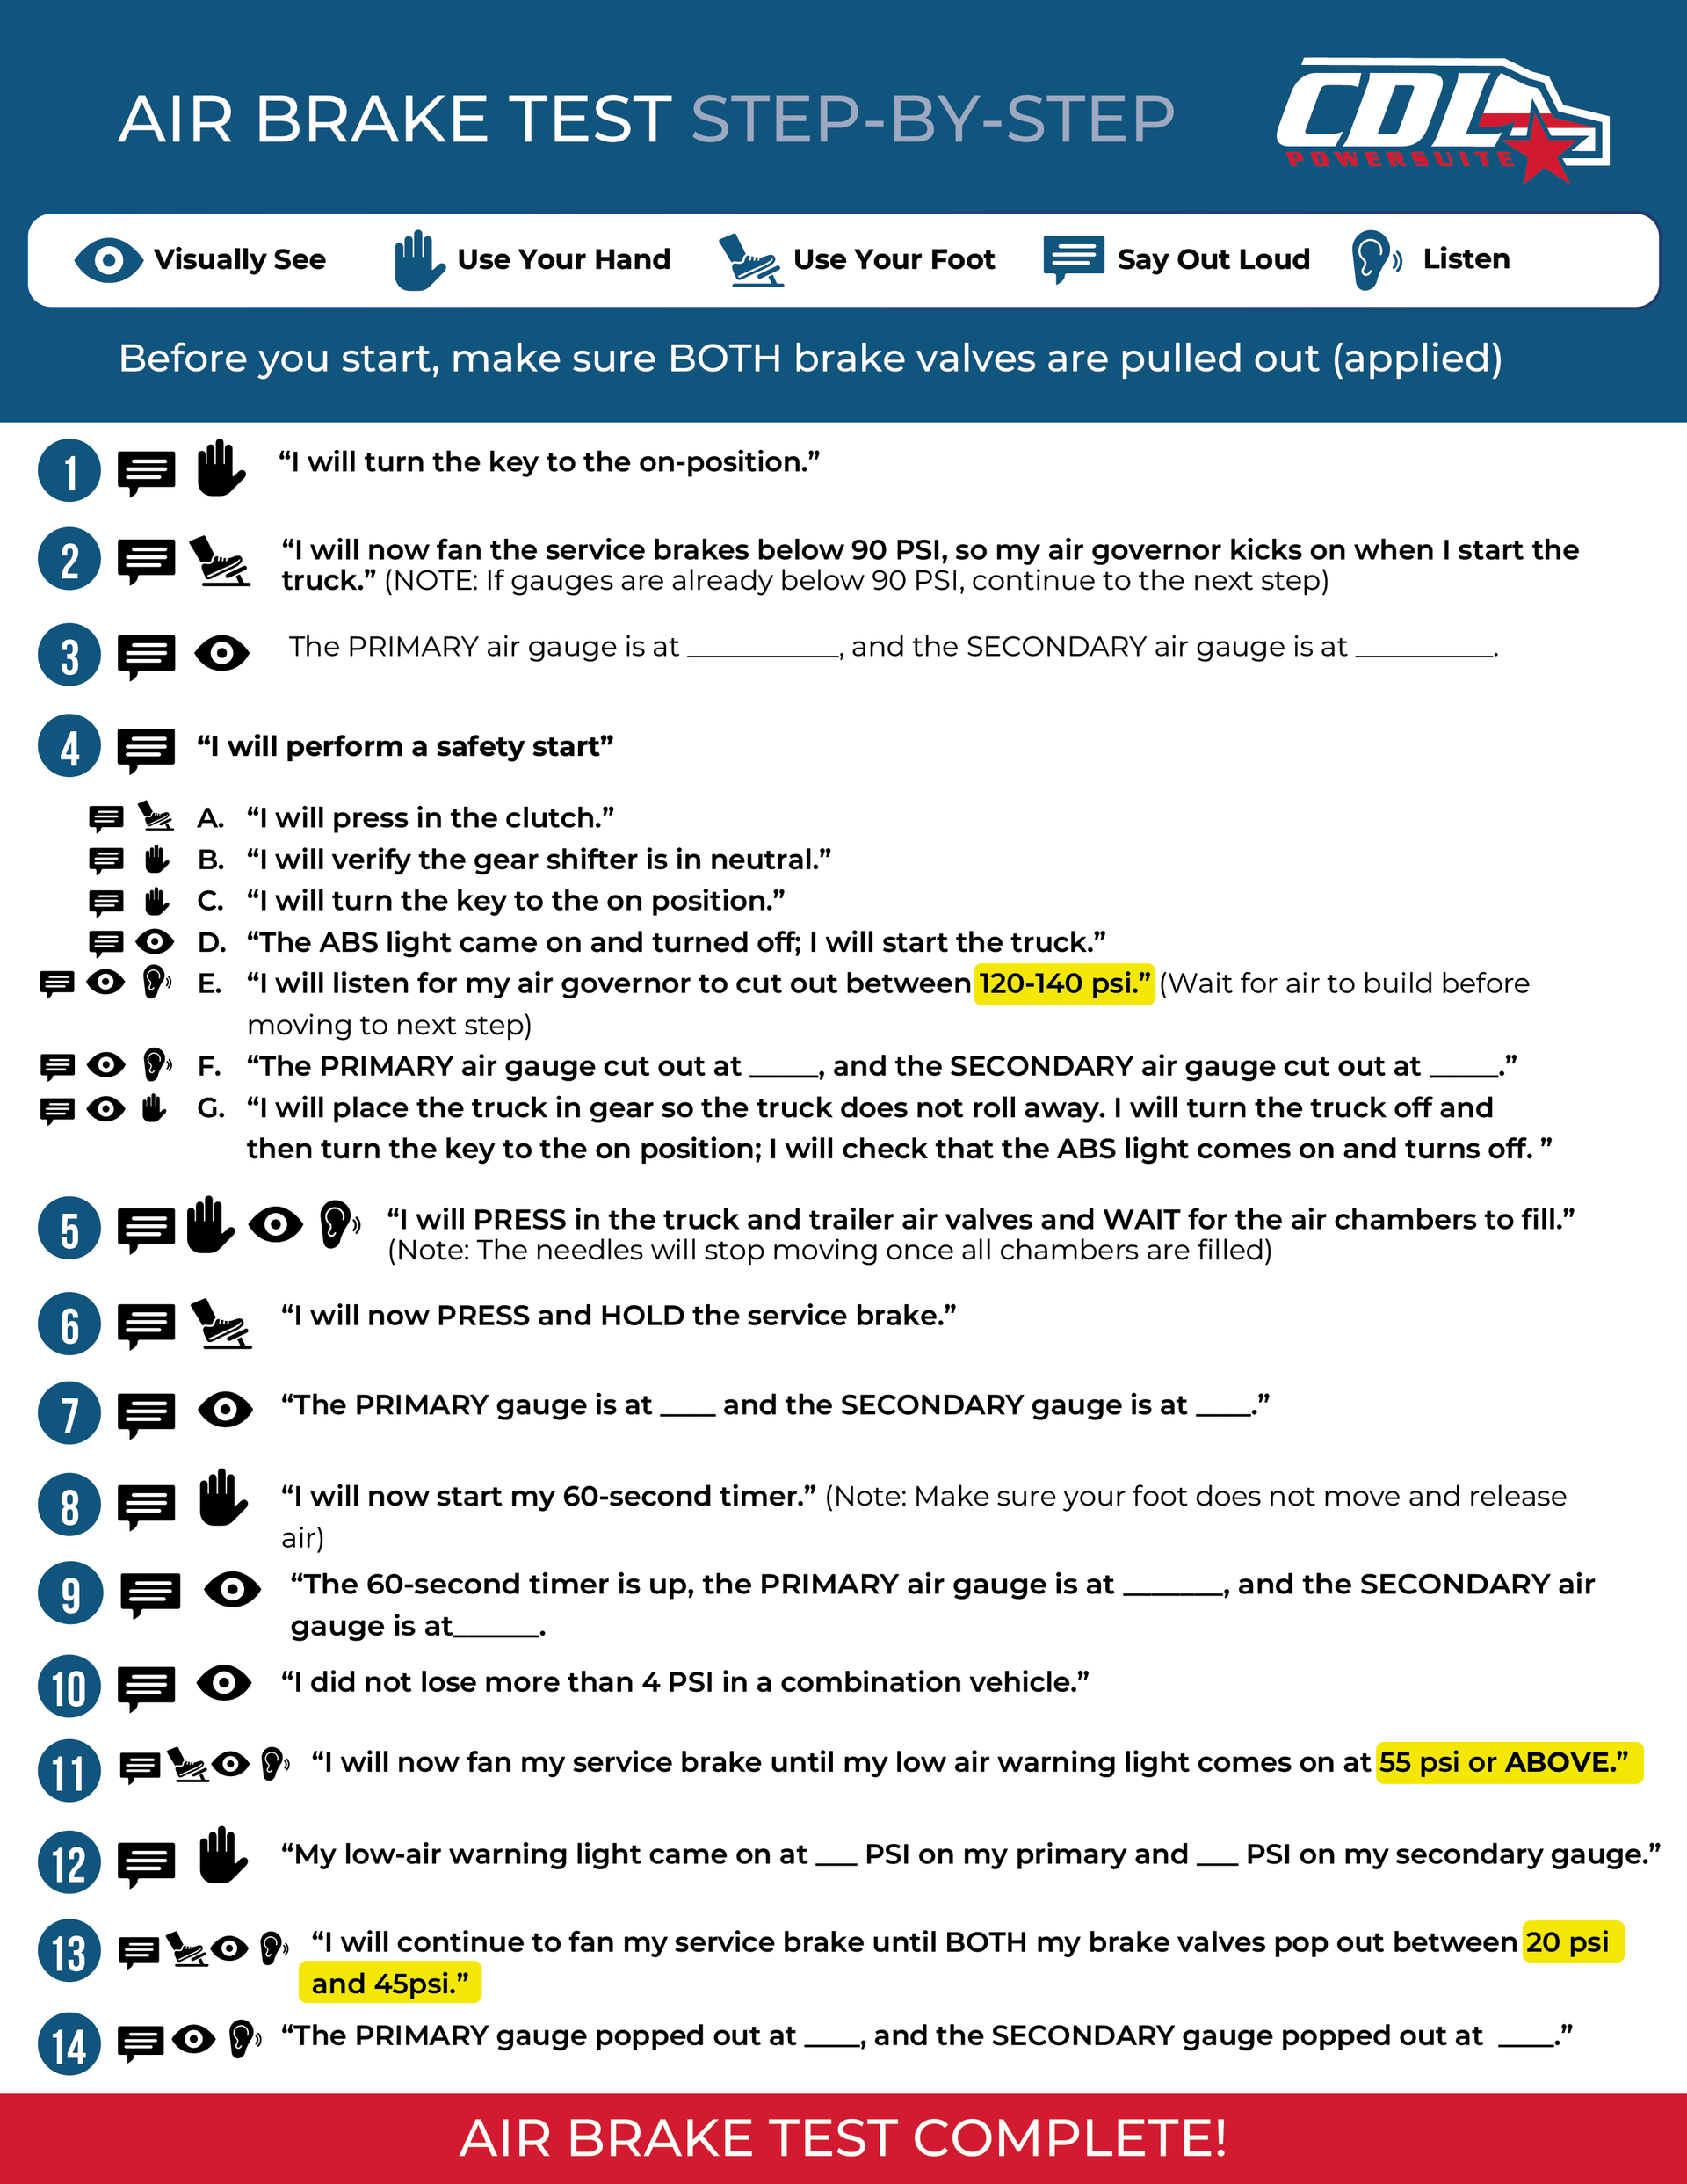
Step 1: Turn the Key to the "On" Position
Say out loud: “I will turn the key to the on-position.”
- Turn the key to the ON position without starting the engine.
Step 2: Fan the Service Brake Below 90 PSI
Say out loud: “I will now fan the service brakes below 90 PSI so my air governor kicks on when I start the truck.”
- Press and release the service brake (foot brake) repeatedly until air pressure drops below 90 PSI.
- This ensures the air governor will kick on when the truck starts.
- (If air pressure is already below 90 PSI, continue to the next step.)
Step 3: Identify Air Pressure Levels
Say out loud: “The PRIMARY air gauge is at ______, and the SECONDARY air gauge is at ______.”
- Record the current air pressure readings.
Step 4: Perform a Safety Start
Say out loud: “I will perform a safety start.”
A.
Say each step while performing it:
- “I will press in the clutch.”
- “I will verify the gear shifter is in neutral.”
- “I will turn the key to the on position.”
- “The ABS light came on and turned off; I will start the truck.”
- “I will listen for my air governor to cut out between 120-140 PSI.”
B. Wait for air pressure to build.
C. Once cut-out occurs, say out loud: - “The PRIMARY air gauge cut out at _____, and the SECONDARY air gauge cut out at _____.”
D. Secure the truck and verify ABS light again: - “I will place the truck in gear so it does not roll away.”
- “I will turn the truck off and then turn the key to the on position.”
- “I will check that the ABS light comes on and turns off.”
Step 5: Fill the Air Chambers
Say out loud: “I will PRESS in the truck and trailer air valves and WAIT for the air chambers to fill.”
- Press in both the truck and trailer air valves.
- Wait for the air chambers to fill.
- The
air pressure needles will stop moving once the chambers are full.
Step 6: Apply and Hold the Service Brake
Say out loud: “I will now PRESS and HOLD the service brake.”
- Press and hold the service brake (foot brake).
Step 7: Check and Record Air Pressure
Say out loud: “The PRIMARY gauge is at _____ and the SECONDARY gauge is at _____.”
- Record the air pressure levels after pressing the service brake.
Step 8: Monitor Air Pressure Loss Over 60 Seconds
Say out loud: “I will now start my 60-second timer.”
- Start a 60-second timer.
- Keep your foot firmly on the brake pedal without moving.
Step 9: Check Air Loss After 60 Seconds
Say out loud: “The 60-second timer is up, the PRIMARY air gauge is at _______, and the SECONDARY air gauge is at ______.”
- After 60 seconds, record the new air pressure readings.
Step 10: Verify Acceptable Air Loss
Say out loud: “I did not lose more than 4 PSI in a combination vehicle.”
- The vehicle must not lose more than 4 PSI in a combination vehicle.
- If more than
4 PSI is lost, the vehicle
fails this part of the test.
Step 11: Identify Low-Air Warning Light Activation
Say out loud: “I will now fan my service brake until my low air warning light comes on at 55 PSI or ABOVE.”
- Fan the service brake (press and release repeatedly) until the low-air warning light activates.
- The
warning light must come on at 55 PSI or above in both the
PRIMARY and
SECONDARY air gauges.
Step 12: Record Low-Air Warning PSI
Say out loud: “My low-air warning light came on at ____ PSI on my primary and ____ PSI on my secondary gauge.”
- Record the PSI at which the warning light activates.
Step 13: Identify Brake Valve Pop-Out Range
Say out loud: “I will continue to fan my service brake until BOTH my brake valves pop out between 20 PSI and 45 PSI.”
- Continue to fan the service brake to further reduce air pressure.
- The
tractor and trailer brake valves should pop out automatically between
20-45 PSI.
Step 14: Record Pop-Out PSI
Say out loud: “The PRIMARY gauge popped out at ____, and the SECONDARY gauge popped out at ____.”
- Record the PSI at which each brake valve popped out.
Contact Us
3620 N Eden Rd, Spokane Valley, WA, 99216
Associate Members of
Pages

Made in the USA
SOFTWARE DEVELOPED ONSHORE
Follow Us
Strategic Partner Of: